Typing Pinyin on Windows Part ][ (a better way)
There was some room for improvement with the last posting I did on how to setup Windows to type pīnyīn. There were four problems with the last keyboard layout installer I found (three if you are in the UK).
First, the original keyboard layout was UK based. If you were using a US keyboard, when you switched to the pīnyīn layout you gained the pīnyīn tone marks, but some keys switched and you lost other keys (for example you would lose the dollar sign and gain the British pound sign).
Second, there was no way to type a ü (at least not that I could find).
Third, the dead keys became literally dead so you could never use those keys for what they had on them. Meaning, you couldn’t type [, ], , or ‘.
And last, I didn’t make the layout so I couldn’t tweak it or release the source - oh the humanity :)
I decided to just make my own keyboard layout to better support a US style keyboard, add in the ü, and make the “dead keys” still usable. I also tried to make it usable to the point where you don’t have to switch between keyboard layouts to use it. Meaning you should be able to just use this layout all the time.
You can download the layout with the installer. And if you’re savvy, you can download the source. The source is not really source code - it’s a project file that you can open and tweak with the following Microsoft program: Keyboard Layout Creator.
How to install the layout
If you would like to use the keyboard layout, download this file and follow the steps in this movie:
Install US Pinyin Keyboard layout
I can’t really support the software in general, but if you have questions you can post them here.
How to use the layout
What the keyboard layout does is it adds the ability to type tone marks, and the ability to type a ü. The following keys are used to type the tone marks and the ü:
Key(s) = Makes
- [ = ā
- ] = á
- ’ = ǎ
- \ = à
- ctrl+alt+u = ü
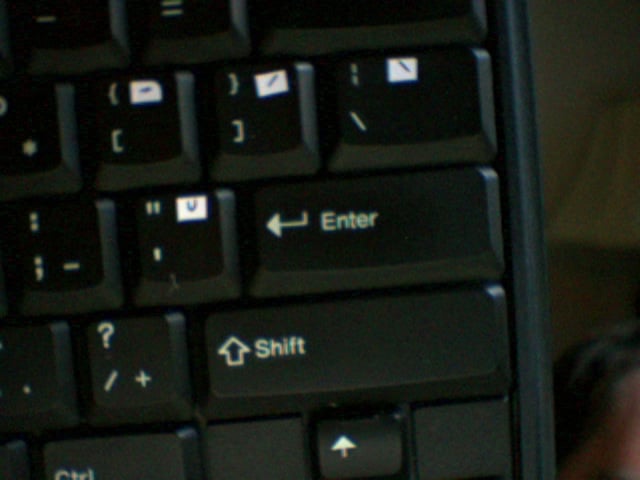
One way to remember the layout is to put stickers on the keyboard like I did with my test computer:
How you actually make the tone marks is by doing the following: you hit the tone mark key before the letter that should have the tone mark. For example, you could type Du then to make ì, you type the __ key then the i key. Another example: to make ě you would press the ’ key, and then the e key.
The only letters that will accept tone marks are a, o, e, i, u and ü.
To type the letter ü, you press and hold the ctrl key, and while still holding down the ctrl key press the alt key. Now that you are holding down both ctrl and alt, press the u key. If you want to add tone marks to ü, you do the same thing as “normal” letters. You’d press the ’ key then ctrl+alt+u to make the ǚ (as in nǚ).
If you want to type the character the tone key was actually designed for (for example you want to type a [), you do the following: press that key, then press the space bar. So, for another example press \ then the space bar, and you will make the character \.
Update 2008年6月20日:
For people having problems with typing ü, I have gotten a report that it only works when “us[ing] the ctrl from the left of the space bar and the alt key from the right of the spacebar” on a Dell Latitude notebook.
If you didn’t see it in the comments below, there is a newer version of this which supports capital letter tone marks: http://robrohan.com/2007/10/19/typing-pinyin-on-windows-part-capital-letter-tones/
I have had a few emails from people asking what license this is under and / or if they can redistribute it to their friends / classmates / students. All are fine with me, I consider this to be in the public domain.
