Server Backup with Amazon S3 (Howto)
I’ve been interested in using Amazon S3 (Simple Storage Service) for server backups, but I couldn’t find a simple, straight forward howto. This is a walk though on one way to setup a Unix server to automatically backup data to Amazon S3.
I guess I should start out with what Amazon S3 is I suppose… It’s a service that you can use to store reams of data, offsite, online, accessible anytime for a decent price. As of this writing the costs are:
Storage: $0.15 per GB-Month of storage used Data Transfer: $0.10 per GB - all data transfer in
$0.18 per GB - first 10 TB / month data transfer out $0.16 per GB - next 40 TB / month data transfer out $0.13 per GB - data transfer out / month over 50 TB
see Amazon S3 for more details. If you use .mac, you can think of it like an iDisk on steroids - or a huge webdav server - but it’s not just one sever it’s a farm of servers with huge amounts of redundancy.
My goal here is to make a simple process that will automatically back up some of my web sites - for this example I am using this blog. What this process is going to do is backup the blogs MySQL database. This will just be a basic setup, but you can tweak it or add to it as you see fit.
The Plan
We are going to make some scripts that dump the database to a directory, and then sync that directory with the Amazon Service. The sync will work somewhat like rsync so if we want to add other files to the sync tree, it will just be a matter of adding them into sync area.
Amazon S3 Account
To start off, you’ll need an S3 account. You can sign up (and login) here. As you can tell, I like the Amazon Storage Service; however, their web site lacks in the usability department in my opinion. So if you get a bit confused trying to navigate the site, don’t worry you’re not alone.
After you go though the account setup process, you’ll need to get your access key id (like your username) and your secret access key (like your password). To find these hover over the Your Web Services Button button on the top right, and click AWS Access Identifiers (See shot below).
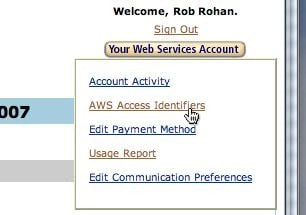
From that screen, on the right you should see your Access Key ID, and be able to show your Secret key. You’ll need these for the next steps.
Using S3 From the Desktop
You’ll likely want access to your S3 account from your desktop. If only to verify the backups are running. However, once you get this setup, see how well it works, and see how inexpensive it is you’ll probably start using it for other stuff (as I do :D).
For desktop access there are quite a few choices. I went the cheap route. I use cockpit. It’s a Java based application that lets you use your S3 account from the desktop. It has the feel of an FTP application. Jungle Disk is another one I hear is very good. It mounts the S3 account as if it’s a remote drive (on Mac) or a drive letter on windows (and it also works on Linux) - Jungle Disk is $20 USD.
I am going to use cockpit in this article, but they should all work about the same.
Start up cockpit. On Mac / Linux, run the file:
{% highlight bash %} $ /Applications/jets3t-0.5.0/bin/cockpit.sh {% endhighlight %}
(on windows it’s the cockpit.bat file)
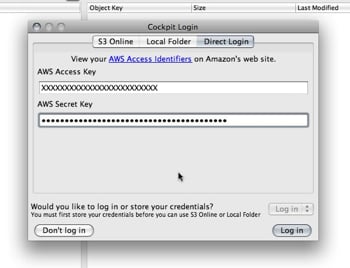
When it first starts up there will be several ways to login. You can read up on the choices on the cockpit website, but for now we’ll use the Direct Login tab. On this tab is where you’ll put the keys you got from the S3 Account page (see image)
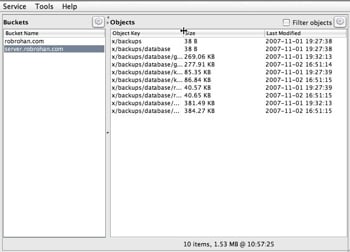
S3 uses things called buckets. You’ll see that term quite a bit when reading about S3. It’s just a place to store stuff. You can think of it as a drive letter (if you’re coming from a windows world), or a database table, or whatever. What we need to do here is make a bucket for our backups. I made one called server.robrohan.com - you can name yours anything you like. The shot below is of my server.robrohan.com bucket and a few backups that have already run.
To create a new bucket, click the gear icon on the left and select Create new bucket…. You’ll need at least one bucket to continue with this article.
Database Dump
Now that we have an Amazon S3 account setup, we can access it from our desktop, and we have one bucket ready to hold stuff we can start doing our backups. The first step in doing a backup of our MySQL database is to get a dump of the database. If you already have a process for this you can skip this section. (Note: This is a very simple way to get a backup of a MySQL database there are better, more efficient ways to do this.)
Here is a simple script to dump a database to a bziped file. You an call this script dbbackup.sh, and it is written so it can be called from cron. (This is pretty insecure, so be sure you’re ok with that or seek help in making it more secure if you need)
 #!/bin/sh

 # This file backs up a database to a backup dir
 # that will be synced with s3

 if [ $# != "3" ]; then
     echo "Usage:"
     echo "      $0 [database] [username] [password]"
     exit 1
 fi

 DATE=`date +%d`
 DB=$1
 USER=$2
 PASS=$3

 BACKUPDIR=/home/my_user_name/backups
 DBSTORE=${BACKUPDIR}/database

 # create database backup
 mysqldump --add-drop-table \
           -h localhost \
           --user=${USER} \
           --password=${PASS} \
           ${DB} \
           | bzip2 -c > ${DBSTORE}/${DB}_${DATE}.sql.bz2
Note the variable BACKUPDIR. This should be a directory you create somewhere on your server that you want to “sync” with the Amazon service. Meaning that anything you put in that directory will get backed up to S3. In this article we are just putting a database backup in the tree, but you could put server code, documents on the server, copies of configuration files, or whatever. The main point being anything in that directory will get copied to S3 (recursively - subdirectories as well).
The script is run like the following:
$ ./dbbackup.sh mydatabase myusername mypasswordAnd would produce the file:
/home/my_user_name/backups/database/mydatabase_[day_of_month].sql.bz2In this process database backups will only go back a month. The first of the month will overwrite the last month’s first of the month backup. If you’d like to archive forever, just change the DATE variable to be date +%y%m%d. For my purposes, doing backups everyday is overkill.
Syncing with S3
So now the meat of the thing. There are, as in the desktop access, many server side scripts you can use to write data to S3. What this example is going to use is s3sync.rb. s3sync is a ruby script that acts much like rsync. There is also an outdated perl version, and even a bash version. You can try others if you’d like, but for this I’ll be using the ruby version. That, of course, means you’ll need ruby on the sever (not rails or anything, just ruby).
(If you don’t have ruby you can do apt-get install ruby, yum install ruby, ports install ruby, or whatever. It’s often very easy to get ruby on your *nix box)
Download and untar the s3sync file:
$ wget http://s3.amazonaws.com/ServEdge_pub/s3sync/s3sync.tar.gz
$ tar -zxvf s3sync.tar.gz
Copy s3config.yml.example to s3config.yml and edit it. Adding in your Amazon S3 keys. It’s also a good idea to setup the SSL certificate so your transfers to S3 will be https. Checkout the README.txt on how to do that. If you don’t care about that remove the -s flag from the script we will be writing in a minute.
(Optional: just to be on the safe side, you might want to make the s3config.yml file owned by the cron user that will run the backup, and then chmod 600 s3config.yml. It’s not a huge amount of security, but it’s better than nothing.)
Next up is the wrapper script that will run the s3sync ruby script. This is a simple script that just moves into the directory where we installed s3sync, and runs the script (I named it s3backup.sh):
 #!/bin/sh

 # This file syncs a direcotry with a specified
 # bucket.
 BACKUPDIR=/home/my_user_name/backups
 SYNCDIR=/home/my_user_name/s3sync
 S3BUCKET=server.robrohan.com
 S3PREFIX=x
 S3STORE=${S3BUCKET}:${S3PREFIX}

 # move to the ruby sync direcotry where the .yml file is
 cd ${SYNCDIR}
 ./s3sync.rb -r -s ${BACKUPDIR} ${S3STORE}
Obviously, you’ll want to change the paths to your install locations (or make them env variables or an include or whatever), the bucket name, and if you are not doing https, remove the -s flag.
Also, the S3PREFIX is any string you want it to be. It’s kind of like a drive letter inside the bucket - the “root” of the bucket so to speak. You can leave it as x.
At this point you should be able to run this script by hand (don’t forget chmod u+x):
$ ./s3backup.shAnd your backup directory should “sync” with S3. You can verify that by refreshing the view in cockpit (the gear on the right has “Refresh object listing”). You can also right click on an object to delete / download it.
I use the sync term is somewhat lightly because the ruby process doesn’t delete files that have been deleted from the backup directory. It will only add or update the files on S3 - hardly a show stopper though.
Cron’ing It
The last step is wrapping this all up into a cron job so you don’t have to think about it. The server should just back itself up.
To do this requires one more simple wrapper server_backup.sh:
 #!/bin/sh

 UTILS=/home/my_user_name/path_to_the_previous_scripts

 # Create database backups
 ${UTILS}/dbbackup.sh database1 myusername1 password1
 ${UTILS}/dbbackup.sh database2 myusername2 password2

 # Send the backups to S3
 ${UTILS}/s3backup.sh
Pretty straight forward. It creates backups of any databases we care about, and then calls the script to sync the backup directory with Amazon S3.
The last step is adding it to cron which you should probably already know how to do, but basically it’s:
$ crontab -eand then adding a line something like:
0 2 * * 1,3,5 /home/my_user_name/path_to_the_previous_scripts/server_backup.shWhich will do a backup at 2:00am on Monday, Wednesday, and Friday - tweak as needed of course.
Conclusion
When I first started coding almost no one out outside of Rome used source control (Rome meaning corporations). Now, if you’re not using source control on your projects people look at you like you’re nuts (and for good reason - it just makes sense to use source control). I think backups are following this same pattern. Everyone knows they should backup, but few actually do - and those that do probably don’t do it offsite or redundantly.
Amazon S3 (and similar services) offer pretty easy to use, low cost, redundant, high bandwidth, always on, offsite storage. If your data == your business, you’re nuts not to use Amazon S3 or something like it.
I hope this lifted some of the mystery of how to use this kind of service (the exercise did for me).